To create a robot application, we first create a standard Android project, then we will convert it to a robot application.
| Step | Action |
|---|---|
From Android Studio, choose: File > New > New Project. 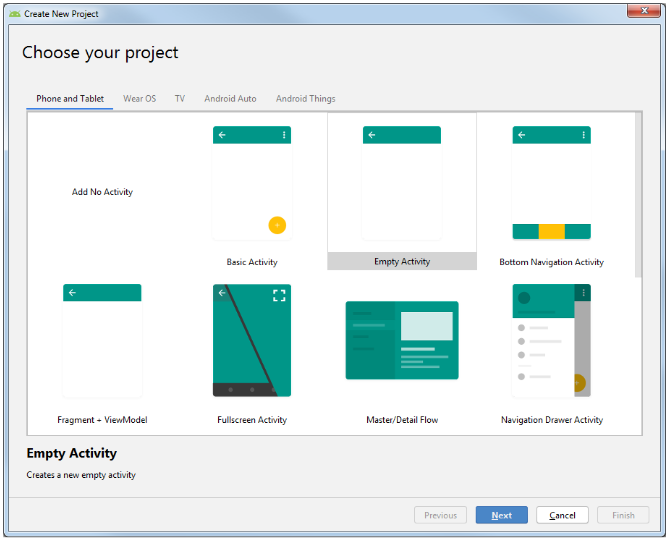
|
|
Click the Next button. 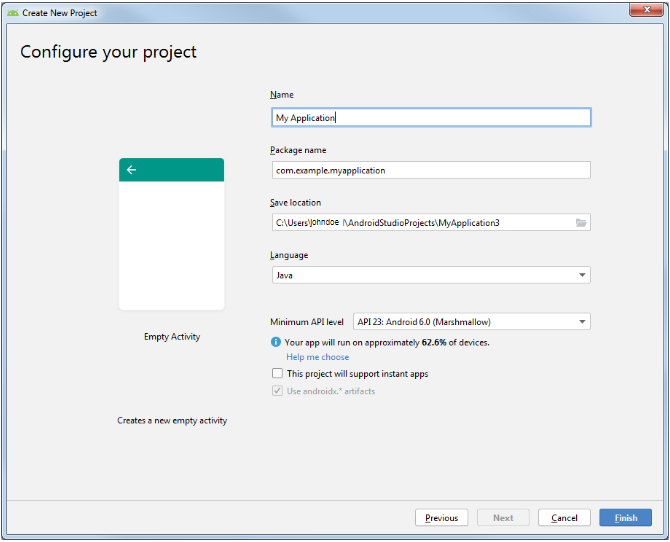
|
|
Configure your project:
|
|
| Click the Finish button. | |
Choose File > Project Structure… > Module and make sure Source Compatibility and Target Compatibility are set to 1.8 (Java 8). 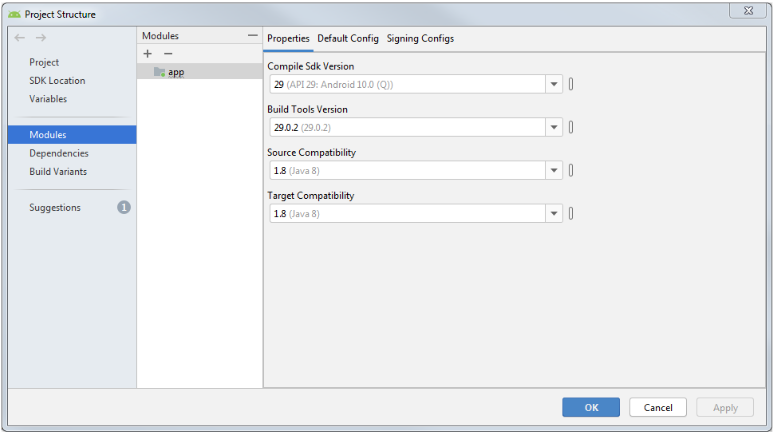
|
Now that you have created the Android project, let’s convert it into a robot application:
| Step | Action |
|---|---|
Once the project is created, choose File > New > Robot Application. 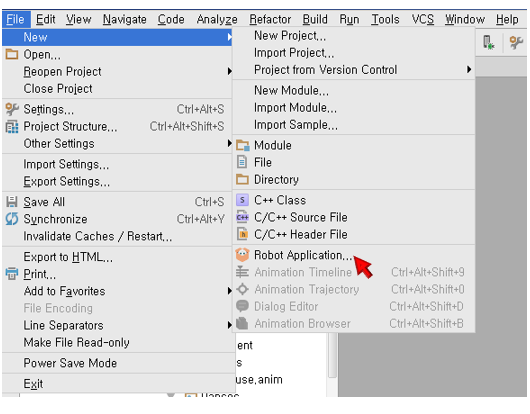
|
|
| Select the minimum Robot SDK version and the module to robotify. Then click OK. |
Result
Your project is now a robot application!
As a result, you should see the following changes:
The robotsdk.xml file has been added to the assets/robot directory.
It contains the minimum Robot SDK version for your project (the one you have selected).
New tools are available in Tools > Pepper SDK and also in the toolbar:
 Emulator and
  Connect.
Use to start a new robot emulator and to connect to a real robot.
The QiSDK dependency has been added to your module’s build.gradle file.
It provides you all the functionalities to interact with Pepper.
A uses-feature tag has been added to your AndroidManifest.xml.
It states that your application uses Pepper and will only be available for the robot tablet.
When using Android Layout Editor, to obtain an accurate display of your applications for Pepper,
make sure to set the Device for Preview to Pepper 1.9 (1280 x 800, tvdpi).
For further details, see: Layout Editor.
We have configured a robot application, now it is time to let our code take the control of Pepper’s body.
class MainActivity : RobotActivity(), RobotLifecycleCallbacks {

    override fun onCreate(savedInstanceState: Bundle?) {
        super.onCreate(savedInstanceState)
        // Register the RobotLifecycleCallbacks to this Activity.
        QiSDK.register(this, this)
    }

    override fun onDestroy() {
        // Unregister the RobotLifecycleCallbacks for this Activity.
        QiSDK.unregister(this, this)
        super.onDestroy()
    }

    override fun onRobotFocusGained(qiContext: QiContext) {
        // The robot focus is gained.
    }

    override fun onRobotFocusLost() {
        // The robot focus is lost.
    }

    override fun onRobotFocusRefused(reason: String) {
        // The robot focus is refused.
    }
}
public class MainActivity extends RobotActivity implements RobotLifecycleCallbacks {

    @Override
    protected void onCreate(Bundle savedInstanceState) {
        super.onCreate(savedInstanceState);
        // Register the RobotLifecycleCallbacks to this Activity.
        QiSDK.register(this, this);
    }

    @Override
    protected void onDestroy() {
        // Unregister the RobotLifecycleCallbacks for this Activity.
        QiSDK.unregister(this, this);
        super.onDestroy();
    }

    @Override
    public void onRobotFocusGained(QiContext qiContext) {
        // The robot focus is gained.
    }

    @Override
    public void onRobotFocusLost() {
        // The robot focus is lost.
    }

    @Override
    public void onRobotFocusRefused(String reason) {
        // The robot focus is refused.
    }
}
| Step | Action |
|---|---|
Register the MainActivity to the QiSDK. |
|
Unregister the Tip: You could also use Important In this first example, we recommend to register and unregister in the
For further details, see: Mastering Focus & Robot lifecycle. |
|
Make your Why? This activity, provided by The QiSDK Design library, brings visual feedbacks when a vocal communication is running. For further details, see: Managing Conversation Feedbacks. |
|
Make your Why? This interface allows the For further details, see: Mastering Focus & Robot lifecycle. |
|
Override the Why? The When the Important The |
|
That’s it! You have created your first robot application.
See now the next step: Running an application.